AndroidStudio カスタムビューの作り方
自分で作ったカスタムビューをレイアウトファイルで配置するまでの手順を書きます。カスタムビューを作ると、そのビューの使い回しができ、とても便利だと思います。また、カスタムビューを使うと、レイアウトファイルが複雑にならなくていいかもしれないです。
AndroidStudioを始めたばかりの人でも分かりやすいように書いていきたいと思っています。
調べていると、カスタムビューは二種類に分けることができるんじゃないか、と思いました。他では分けていないと思うので、一般的ではないですが、ここではカスタムビューをカスタムレイアウトとカスタムビューの二種類に分けて書いていきます。
目次
カスタムレイアウト
カスタムレイアウトでは、ViewGroupクラスのサブクラスを継承したクラスを作ります。レイアウトxmlファイルを使ってカスタムビューをデザインできます。もちろんJavaでもコンポーネントの追加ができますが、ここでは紹介しません。
ここで作るサンプル

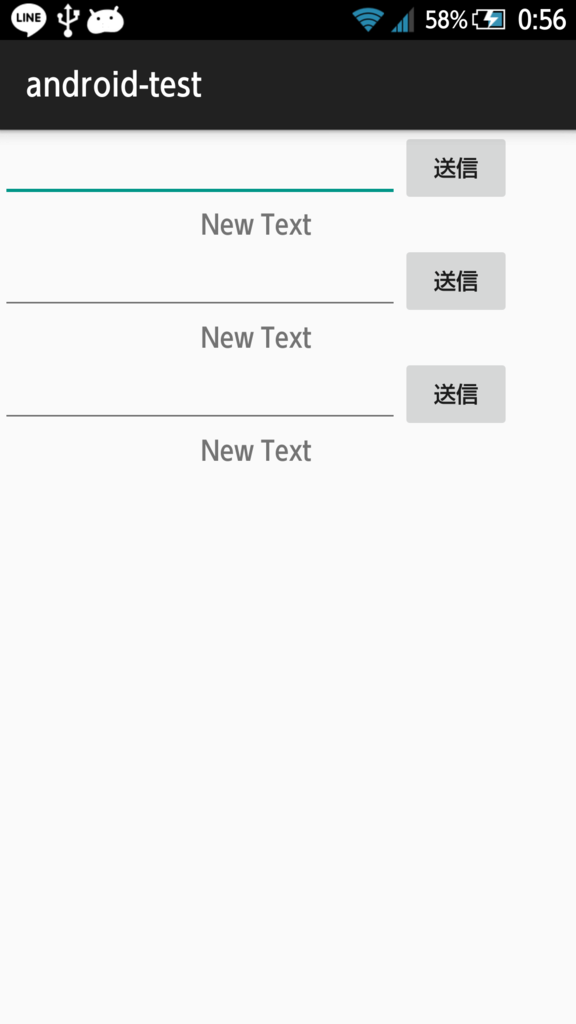
EditTextに文字を入力して「送信」Buttonを押すと、EditTextの下のTextViewがEditTextの内容に変わり、EditTextは空になります。
大雑把な手順
1. res/layoutフォルダの中に、レイアウトファイルを作る。
2. ViewGroupのサブクラスを継承したjavaクラスを作る。
3. メインのレイアウトファイルにカスタムレイアウトを配置する。
詳しい説明
1.res/layoutフォルダの中に、レイアウトファイルを作る。
res/layoutフォルダの中に作りたいカスタムレイアウトのxmlファイルを作る。


サンプル「res/layout/custom_layout.xml」
<?xml version="1.0" encoding="utf-8"?>
<LinearLayout
    xmlns:android="http://schemas.android.com/apk/res/android"
    android:orientation="vertical"
    android:layout_width="match_parent"
    android:layout_height="match_parent"
    android:weightSum="1">

    <LinearLayout
        android:layout_width="wrap_content"
        android:layout_height="wrap_content"
        android:orientation="horizontal">

        <EditText
            android:layout_width="250dp"
            android:layout_height="wrap_content"
            android:id="@+id/editText" />

        <Button
            android:layout_width="70dp"
            android:layout_height="wrap_content"
            android:text="送信"
            android:id="@+id/button" />

    </LinearLayout>

    <TextView
        android:layout_width="320dp"
        android:layout_height="wrap_content"
        android:text="New Text"
        android:gravity="center"
        android:id="@+id/textView"
        android:textSize="50px" />

</LinearLayout>
このレイアウトファイルは、以下の図のような構造になっています。
| エディットテキスト | ボタン |
| テキストビュー | |
2. ViewGroupのサブクラスを継承したjavaクラスを作る。


package com.***.***.***;

import android.content.Context;
import android.util.AttributeSet;
import android.view.LayoutInflater;
import android.view.View;
import android.widget.Button;
import android.widget.EditText;
import android.widget.LinearLayout;
import android.widget.TextView;


public class CustomLayout extends LinearLayout implements View.OnClickListener {
    private TextView text;
    private EditText editText;

    public CustomLayout(Context context, AttributeSet attr) {
        super(context, attr);

        View layout = LayoutInflater.from(context).inflate(R.layout.custom_layout, this);

        text = (TextView)layout.findViewById(R.id.textView);
        editText = (EditText)layout.findViewById(R.id.editText);
        Button button = (Button)layout.findViewById(R.id.button);
        button.setOnClickListener(this);
    }

    public void onClick(View view) {
        if(view.getId() == R.id.button) {
            text.setText(editText.getText());
            editText.setText(null);
        }
    }
}
CustomLayoutクラスは、ViewGroupクラスのサブクラスであるLinearLayoutを継承し、OnClickListenerインターフェイスを実装しています。
LinearLayoutクラスは、先ほど作成したレイアウトのルートがLinearLayoutなので、継承させています。
ViewGroupについては、こちらのサイトをご覧ください。
OnClickListenerは、ボタンが押されたことを知るために実装させています。
OnClickListenerについては、
こちらのサイトを参考にさせていただきました。
次の
LayoutInflater.from(context).inflate(R.layout.custom_layout, this);
この文では、先ほど作ったレイアウトファイルを設定しています。
詳しくは、こちらのサイトをご覧ください。
OnClick( )関数では、テキストビューのテキストをエディットテキストの内容に変えて、エディットテキストを空にしています。
3. メインのレイアウトファイルにカスタムレイアウトを配置する。
サンプル「res/layout/activity_main.xml」(デフォルトからいじっていなければこの名前になっているはず。)
<LinearLayout
    xmlns:android="http://schemas.android.com/apk/res/android"
    android:layout_width="match_parent"
    android:layout_height="match_parent"
    android:orientation="vertical">

    <com.example.kondoutomoko.android_test.CustomLayout
        android:layout_width="wrap_content"
        android:layout_height="wrap_content" />

    <com.example.kondoutomoko.android_test.CustomLayout
        android:layout_width="wrap_content"
        android:layout_height="wrap_content" />

    <com.example.kondoutomoko.android_test.CustomLayout
        android:layout_width="wrap_content"
        android:layout_height="wrap_content" />

</LinearLayout>
このレイアウトファイルでは、先ほど作ったカスタムレイアウトを縦に3つ並べています。
カスタムビュー
カスタムビューでは、Viewクラスを継承したクラスを作ります。
先ほどのカスタムレイアウトではあまり意味がないので書きませんでしたが、MainActivityのsetContentView(View) メソッドの引数には、レイアウトファイルのIDだけでなく、Viewクラスのサブクラスも渡すことができます。先ほどのカスタムレイアウトでは、CustomLayoutクラスを渡すことができます。この記事では、setContentView(View)メソッドにクラスを渡す方法は省略させていただきます。
ここで作るサンプル

それぞれのコンポーネントをタップすると、色が変わります。
大雑把な手順
1. Viewクラスを継承したJavaクラスを作る。
2. メインのレイアウトファイルにカスタムビューを配置する。
詳しい説明
1.Viewクラスを継承したJavaクラスを作る。
package com.***.***.***;

import android.content.Context;
import android.graphics.Canvas;
import android.graphics.Color;
import android.graphics.Paint;
import android.graphics.Rect;
import android.util.AttributeSet;
import android.view.MotionEvent;
import android.view.View;


public class CustomView extends View {
    private int status;
    private Paint paint;
    private Rect rect;

    public CustomView(Context context, AttributeSet attrs) {
        super(context, attrs);

        Init();
    }

    private void Init() {
        status = 0;
        paint = new Paint();
        paint.setColor(getColor());
        rect = new Rect();
    }

    @Override
    protected void onSizeChanged(int w, int h, int old_w, int old_h) {
        rect.left = w/10;
        rect.top = h/10;
        rect.right = w*9/10;
        rect.bottom = h*9/10;
    }

    @Override
    protected void onDraw(Canvas canvas) {
        super.onDraw(canvas);

        canvas.drawRect(rect, paint);
    }

    @Override
    public boolean onTouchEvent(MotionEvent e) {
        if(e.getAction() == MotionEvent.ACTION_DOWN) {
            status = (status >= 2) ? 0 : status+1;
            paint.setColor(getColor());
            invalidate();
        }
        return true;
    }

    private int getColor() {
        int color;

        switch(this.status) {
            case 0:
                color = Color.RED;
                break;
            case 1:
                color = Color.GREEN;
                break;
            case 2:
                color = Color.BLUE;
                break;
            default:
                color = Color.BLACK;
        }
        return color;
    }
}
Viewクラスを継承しています。コンストラクタでは、親クラスのコンストラクタを呼び、メンバ変数を初期化しています。カスタムビューでは、onSizeChanged()メソッドとonDraw()メソッドをオーバーライドする必要があります。
2. メインのレイアウトファイルにカスタムビューを配置する。
<LinearLayout
    xmlns:android="http://schemas.android.com/apk/res/android"
    xmlns:custom="http://schemas.android.com/apk/res-auto"
    android:layout_width="match_parent"
    android:layout_height="match_parent"
    android:orientation="vertical">

    <com.example.kondoutomoko.android_test.CustomView
        android:layout_width="match_parent"
        android:layout_height="1dp"
        android:layout_weight="1" />

    <com.example.kondoutomoko.android_test.CustomView
        android:layout_width="match_parent"
        android:layout_height="1dp"
        android:layout_weight="1" />

    <com.example.kondoutomoko.android_test.CustomView
        android:layout_width="match_parent"
        android:layout_height="1dp"
        android:layout_weight="1" />

</LinearLayout>
カスタムビューを縦に3つ並べています。
styleableプロパティの使い方
独自のプロパティを設定するには、styleableプロパティを使います。
先ほどのカスタムレイアウトにstyleableプロパティを設定し、汎用性を持たせてみます。
ここで作るサンプル

カスタムレイアウトのサンプルと比べると、Buttonのテキストが変わっています。また、「削除」Buttonを押してもTextViewのテキストが変わらないようになっています。
大雑把な手順
1. 「res/values」フォルダの中にxmlリソースファイルを作る。
2. リソースファイルで定義したプロパティをCustomLayoutクラスで読み込む。
3. メインのレイアウトファイルで、リソースファイルで定義したプロパティに値をセットする。
詳しい説明
1. 「res/values」フォルダの中にxmlリソースファイルを作る。
カスタムレイアウトでレイアウトファイルを追加したのと同様に、「res/values」フォルダの中に「custom_layout_attr.xml」を作成する。
サンプル「res/values/custom_layout_attr.xml」
<?xml version="1.0" encoding="utf-8"?>
<resources>
    <declare-styleable name="CustomLayout">
        <attr name="EnableToSend" format="boolean"></attr>
        <attr name="ButtonName" format="enum">
            <enum name="send" value="0" />
            <enum name="save" value="1" />
            <enum name="delete" value="2" />
        </attr>
    </declare-styleable>
</resources>
declare-styleableラベルのname属性の値が識別子となります。プロパティを読み込むクラスと同じ名前にします。
attrラベルでプロパティを定義します。format属性に設定できる値は、下の図の通りです。
| 値 | 意味 |
| boolean | boolean値。(例:true) |
| integer | int値。(例:2) |
| float | float値。(例:1.6) |
| string | 文字列。(例:"あいう" or "@string/***") |
| enum | 列挙型。(例:{ a=1, b=2, c=3 }) |
| flag | ビットフラグ。(例:{ a=1, b=2, c=4 }) |
| dimension | dimension単位。(例:100dp) |
| color | 色。(例:"#ABCDEF" or "@color/***) |
| reference | リソースIDの参照。(例:"@drawable/***"等) |
2. リソースファイルで定義したプロパティをCustomLayoutクラスで読み込む。
CustomLayout.javaを下のサンプルのように変更する。赤い文字のところが変更したところになります。
package com.***.***.***;

import android.content.Context;
import android.content.res.TypedArray;
import android.util.AttributeSet;
import android.view.LayoutInflater;
import android.view.View;
import android.widget.Button;
import android.widget.EditText;
import android.widget.LinearLayout;
import android.widget.TextView;


public class CustomLayout extends LinearLayout implements View.OnClickListener {
    private TextView text;
    private EditText editText;
    private boolean mEnableToSend;
    private int mButtonName;

    public CustomLayout(Context context, AttributeSet attr) {
        super(context, attr);
        View layout = LayoutInflater.from(context).inflate(R.layout.custom_layout, this);

        TypedArray a = context.obtainStyledAttributes(
                attr, R.styleable.CustomLayout, 0, 0);
        try {
            mEnableToSend = a.getBoolean(R.styleable.CustomLayout_EnableToSend, true);
            mButtonName = a.getInteger(R.styleable.CustomLayout_ButtonName, 0);
        } finally {
            a.recycle();
        }

        text = (TextView)layout.findViewById(R.id.textView);
        editText = (EditText)layout.findViewById(R.id.editText);

        Button button = (Button)layout.findViewById(R.id.button);
        button.setOnClickListener(this);
        switch(mButtonName) {
            default:
            case 0:
                button.setText("送信");
                break;
            case 1:
                button.setText("保存");
                break;
            case 2:
                button.setText("削除");
                break;
        }
    }

    public void onClick(View view) {
        if (view.getId() == R.id.button) {
            if (mEnableToSend)
                text.setText(editText.getText());
            editText.setText(null);
        }
    }
}
まず、
TypedArray a = context.obtainStyledAttributes(attrs, R.styleable.CustomLayout, 0, 0);
この文で a に「custom_layout_attr.xml」で定義したプロパティを読み込んでいます。
次に、
getBoolean()やgetInteger()でプロパティに設定した値を読み込んでいます。これらの関数の第二引数は初期値となっています。他のフォーマットを読み込む関数も用意されています。詳しくは、こちら(Android developerのReference)をご覧ください。
そして、とても重要なことがあります。obtainStyledAttributes()で取得したTypedArrayは、共用資源なので、必ずrecycle()を呼ぶ必要があります。
後の変更は重要ではないので、説明は省略します。
3. メインのレイアウトファイルで、リソースファイルで定義したプロパティに値をセットする。
コンポーネント毎にそれぞれ値を設定することで、同じカスタムレイアウトでも違う機能や見た目を提供することができます。
サンプル「res/layout/activity_main.xml」
<LinearLayout
    xmlns:android="http://schemas.android.com/apk/res/android"
    xmlns:custom="http://schemas.android.com/apk/res-auto"
    android:layout_width="match_parent"
    android:layout_height="match_parent"
    android:orientation="vertical">

    <com.example.kondoutomoko.android_test.CustomLayout
        android:layout_width="wrap_content"
        android:layout_height="wrap_content"
        custom:EnableToSend="true"
        custom:ButtonName="send" />

    <com.example.kondoutomoko.android_test.CustomLayout
        android:layout_width="wrap_content"
        android:layout_height="wrap_content"
        custom:EnableToSend="true"
        custom:ButtonName="save" />

    <com.example.kondoutomoko.android_test.CustomLayout
        android:layout_width="wrap_content"
        android:layout_height="wrap_content"
        custom:EnableToSend="false"
        custom:ButtonName="delete" />

</LinearLayout>
上から3行目の、
xmlns:custom="http://schemas.android.com/apk/res-auto"
では、http://schemas.android.com/apk/res-autoという長ったらしいURLをcustomで表すよ、という宣言になっています。
同じコンポーネントでもstyleableプロパティに設定する値を変えることで、違う機能や見た目を提供することができます。
まとめ
私がカスタムビューをカスタムレイアウトとカスタムビューに分けた理由は、以下の3点からです。
1. 継承するクラスが違う
2. カスタムビューでは、onDraw()メソッドをオーバーライドする必要があるが、カスタムレイアウトではしない
3. カスタムレイアウトではレイアウトファイルを読み込むことができるが、カスタムビューではできない
既存のコンポーネントを配置する場合はカスタムレイアウトを作り、オリジナルのビューを作りたい場合はカスタムビューを作る、というふうに使い分けることができると思います。
styleableプロパティを上手に設定できると、他のアプリケーションでも使いまわせるコンポーネントを作ることができそうです。